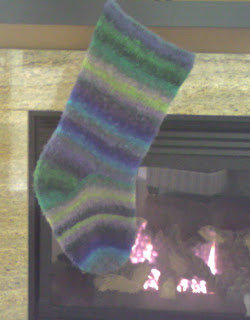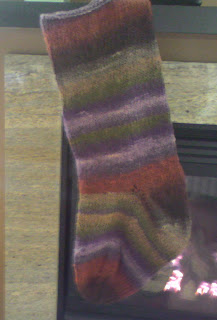
 I knit these up last year. Here is the pattern. The blue stocking has been felted and the brown one hasn't been felted yet.
Materials
3 balls Noro Kureyon
7mm double pointed needles
If you wish, you can knit the stocking on a 7mm circular 40cm long but you will still need the double points.
3 stitch markers-2 in one colour and 1 a different colour (use this one to mark the start of the row)
Abbreviations:
K-knit
P-purl
Tog-together
Ssk-slip one stitch as if to knit, slip one stitch as if to purl, slip the tip of the left needle through the front of these 2 stitches and knit them
Sl-slip the stitch from the left needle to the right needle as if to knit
Cast on 64 stitches loosely. Join into a round (be careful not to twist the stitches. This will have to be checked before and after the first round.) Place the marker to mark the start of your row on the needle. Work in stocking stitch (knit every row) until it measures 15" long.
Divide for heel
Knit 16 stitches past your marker. Turn your work. You will be working on 32 stitches back and forth for the heel. You can do this on the circular needle or on 2 of the double pointed needles if you are more comfortable with it this way.
Row 1: slip 1 and purl to the end.
Row 2: slip 1 and knit to end.
Work a total of 24 rows for the heel.
Row 1: sl 1, p20, p2tog, p1, turn
Row 2: sl 1, k11, ssk, k1, turn
Row 3: sl 1, p12, p2tog, p1, turn
Row 4: sl 1, k13, ssk, k1, turn
Row 5: sl 1, p14, p2tog, p1, turn
Row 6: sl 1, k15, ssk, k1, turn
Row 7: sl 1, p16, p2tog, p1, turn
Row 8: sl 1, k17, ssk, k1, turn
Row 9: sl 1, p18, p2tog, p1, turn
Row 10: sl 1, k19, ssk , k1
The heel is now turned and there are 22 stitches on the heel needle. You will now be working in rounds again.
Pick up and knit 12 stitches along heel edge and place a different coloured marker. Knit across the 32 stitches that weren't used for the heel and place a marker. Pick up knit 12 stitches along the heel edge. Knit across 11 stitches and place your beginning of the row marker. You should have 78 stitches on your needle.
Knit one row.
Row 1: Knit to the 3 stitches before the first marker that is not the start of your row, K2tog, K1. Knit to the next marker, k1, ssk, knit to the end.
Row 2: Knit
Repeat these 2 rows 5 times (a total of 10 rows worked).
Then repeat row 1 until you have 64 stitches left on your needle.
Knit every row for 20 rows.
Shape toe
Row 1: Slip marker that marks beginning of your row, *Knit to three stitches before first marker, k2tog, k1, slip marker, k1, ssk.* Repeat from * to *. You will now be at the beginning of row.
Row 2: knit
During these decreases you will have to change to double pointed needles. Repeat these 2 rows 5 times. Total of 10 rows marked. Now Repeat Row 1 until 12 stitches left on needle.
Cut the yarn leaving a long tail. With a sewing needle thread the tail through the remaining stitches and pull tight. Sew the tail in on the inside of the stocking. Sew in the rest of your ends.
For the loop to hang the stocking from you will make an I-Cord.
How to make an I-Cord
With double pointed needles, cast on 4 stitches with double strand of yarn. Knit all the stitches. Switch needles in your hands, so the needle with the stitches is in your left hand again. Slide the stitches to the other end of the needle and pulling the yarn across the back of the stitches knit the row again. Continue this way, sliding and knitting, until the cord is the length you wish. Give the cord a tug to make the little carry across the back disappear. Work in I-cord for 22 rows. Cast off the stitches and sew in the ends.
To Felt
Set your washer to a small load on hot wash and cold rinse (you're not going to use the rinse cycle though). Add a teaspoon or two of clear dish detergent or laundry soap. Many reference books recommend a detergent made for washing wool that does not require rinsing. Place the knitted tote into a clean zippered pillow protector (to protect your washer's pump from excess fibers) and add it to the washer. Throw in a pair of old jeans or two or three tennis balls (to increase agitation, close the lid. Wait about 5 minutes.
Pull the pillow protector from the washer, open the zipper and check on the size of your item. If it's too large, zip up and toss it back in the washer for a few more minutes. Keep checking often until the yarn looks matted like felt. If you need more time, turn the timer back to the start. Remove it from the washer (don't let it go through the spin or rinse cycles). Rinse it in cold water (that will set the felt even more firmly) until no suds is left (the rinse-free detergent eliminates the need for this step). Lay out to dry (lay in between towels to go faster). Sew on I-Cord at top for hook.
Julie Schilthuis
The Needle Emporium